Meteor Tutorial - Let's build a Twitter clone (Part 4: Security & File Structure)
This is part 4 of the twitterClone Meteor tutorial.
| Part 1 - Intro to Meteor | link |
| Part 2 - Client Template JS | link |
| Part 3 - User Account | link |
| Part 4 - Security & Structure | link |
| Part 5 - Server Methods | link |
| Part 6 - Data Publish/Subscribe | link |
We will be securing our application and organzing the application so the codebase can scale nicely. The complete code can be found on github.
Section 1: Remove autopublish and insecure
Let's take a closer look at the meteor packages that we have been working with. If you type the following command in your app directory, you can see all the packages:
meteor list
accounts-password  1.1.1  Password support for accounts
accounts-ui        1.1.5  Simple templates to add login widgets to an app
autopublish        1.0.3  Publish the entire database to all clients
insecure           1.0.3  Allow all database writes by default
meteor-platform    1.2.2  Include a standard set of Meteor packages in your app
twbs:bootstrap     3.3.5  The most popular front-end framework for developing responsive, mobile first projects on the web.
We know we added accounts-password, accounts-ui, and twbs:boostrap. And meteor-platform is the standard Meteor package. So what is up with insecure and autopublish?
Insecure and autopublish are packages designed for developer-friendliness. We have been able to take for granted that we can access and modify databases on the client-side without any authentication. For example, you can type in the following command in the browser console:
Meteor.users.find().fetch()
And you will get the entire list of users and their emails!!! This is because the autopublish package allows the server to publish all the database in complete form. We do not want this. So let's remove it.
meteor remove autopublish
Now you should see that the same db query on the client-side will get you an empty list.
But we are not done! Right now, anyone can update and remove any tweets. Once again, back in the browser console:
Tweets.remove({_id: 'LLkZythcGAcy6YiXp'})
Essentially, anyone can perform the db update, insert, and remove operations from any client. We can remove the insecure package to prevent this:
meteor remove insecure
Now, if you try to remove tweets, you get a notification:
remove failed: Access denied
Section 2: Meteor Application File Structure
We have been storing all of the javascript code inside of a single file up to this point. This is not scalable in a real-life application. Meteor offers a high level of flexibility when it comes to file structure (doc). Meteor has its own file loading order that you cannot override. I won't go into too much detail about this. You should understand that you do not get to specify each javascript dependency in your html as is the case with most other frameworks. All files are loaded. So you should exercise caution when it comes to structuring your files.
There are special directory names that you can define in your file structure for Meteor framework:
- client (same as Meteor.isClient)
- server (same as Meteor.isServer)
- public (static assets)
- private (assets only available to server)
- tests (test code)
Additionally, files inside of /lib are loaded before their parent directories.
The application currently does not have not assets or tests. We will simply divide the content into client/server files. The database is shared for both the server and the client. So we want to put our database in the /lib folder. See the new file structure:
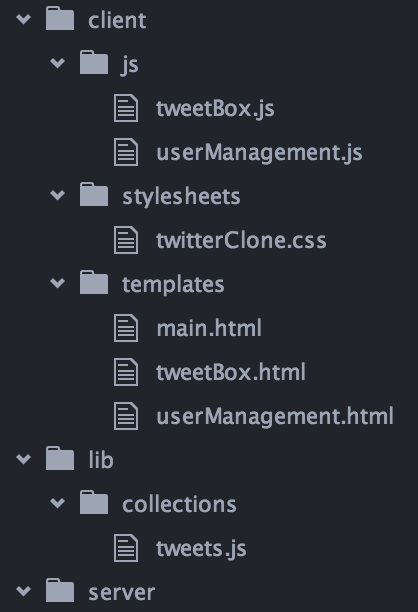
On the client-side, I further separated the code into the stylesheets (css)/templates (html)/js. We can now start to write code in a structured fashion.
| Part 1 - Intro to Meteor | link |
| Part 2 - Client Template JS | link |
| Part 3 - User Account | link |
| Part 4 - Security & Structure | link |
| Part 5 - Server Methods | link |
| Part 6 - Data Publish/Subscribe | link |